


옵션정보
[(201447314)Black]
상품정보
- 브랜드 이름: VODOOL
- 배터리 포함: no
- 힌트 관련 화학: 없음
- 원산지: 중국
- 외부 테스트 증명서: NONE
- 재료: Metal
- 제품 길이: 14
- 품목 유형: 경보망 & 안전
- 특징: Tire Pressure Monitoring System
- 품목 너비: 10
- 모델명: Motorcycle TPMS
- 품목 높이: 3.8
- 전압: 12V
- 제품 중량: 200
- 증명서: 세륨
- 증명서: NONE
- Choice: yes
- semi_Choice: yes

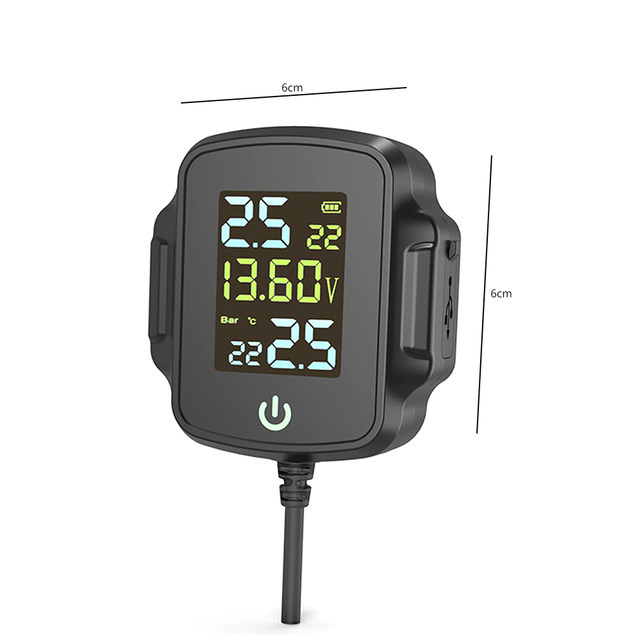
AN-08A Motorcycle TPMS Motorbike Tire Pressure Monitoring System Tyre Temperature Alarm System with QC 3.0 USB Charger for Phone Tablet
Description:
This TPMS is designed to provide you with more protection when riding. It will warn the tire condition in advance. After installing TPMS, this system can monitor the tire pressure and temperature in real time. If any abnormal tire pressure and temperature are detected, the system will send a warning sound and a bright flashing icon to inform you in real time. Real-time reminders and problem solving can prevent traffic accidents and ensure the safety of riders and passengers.
Feature:
With a QC 3.0 fast charging USB output, it can charge mobile phones, tablets and power banks.
Support battery voltage detection and display, and low-voltage alarm function.
Specification:
Model: AN-08A
Tire pressure setting range: 0.1~6.0Bar
Temperature setting range: 60℃~100℃
Working temperature: -20℃~+80℃
Storage temperature: -30℃~+85℃
Power voltage: DC 12V
Output voltage: DC 12V, 9V, 5V
Frequency: 433.92MHz±20.00MHz
Receiver:
Working temperature --20℃~80℃
Storage temperature: -30℃~85℃
Power-on voltage: DC 5V
Frequency: 433.92MHz±20.00MHz
Sensor:
Working temperature: -20℃~80℃
Storage temperature: -30℃~85℃
Pressure range: 0~6.6Bar
Pressure accuracy: +/-0.1Bar
Temperature accuracy: +/-3℃
Transmitting power: <10dB
Frequency: 433.92MHz±20.00MHz
Bracket installation instructions
1. Unscrew the 2 screws, put on the motorcycle/electric bike/bicycle and tighten;
2. Place the mounting head of the bracket toward the position you need, and confirm that the bracket is firm;
3. Install the tire pressure receiver on the bracket, tighten it and then lock it; use the ball head to rotate the tuning knob to move the joint part to adjust the appropriate angle appropriately
Power installation instructions
1. When installing, the power cord needs to be connected behind the ignition switch, and the power can be automatically cut off after shutting down. The red connects to the 12V positive pole and the black connects to the ground.
2. Install the fixed bracket on the handlebar and lock it tightly. Install the host on the bracket and adjust the angle and lock it.
3. Install the sensor when the host is turned on. First install the tamper ring into the valve nozzle, then install the sensor on the valve according to the position and tighten it, then screw the tamper ring back and tighten it. If you find that there is no corresponding position on the host If the pressure is displayed, reinstall the sensor at the corresponding position.
Sensor battery replacement instructions:
When replacing the battery of the sensor, please disassemble one by one, install the shell, do not mix or disassemble and install at the same time; it can effectively prevent the sensor from being misplaced and installed on other tires due to the wrong shell. (Button CR1632, working temperature is -30℃~+80℃); it is available in stores.
1. Before disassembling the sensor, please prepare a nut wrench, turn the nut clockwise to separate the nut and the sensor, and then remove the sensor counterclockwise;
2. Use a wrench to unscrew the upper cover of the sensor in a counterclockwise direction;
3. Take out the old battery from the battery clip and do a good job of environmental protection classification;
4. Distinguish the positive and negative positions (positive "+" facing up); install a new button battery CR1632.
5. Screw on the upper cover of the sensor, and then tighten it clockwise with a wrench
Note:
There may be slight size deviations due to manual measurement, different measuring methods and tools.
The picture may not reflect the actual color of the item because of different photographing light, angle and display monitor.

1 X Receiver
2 X Sensors
1 X Bracket
1 Set X Accessories


AN-08A 오토바이 TPMS 오토바이 타이어 압력 모니터링 시스템 전화 태블릿에 대한 QC 3.0 USB 충전기와 타이어 온도 경보 시스템
설명:
이 TPMS는 승차시 더 많은 보호 기능을 제공하도록 설계되었습니다. 타이어 상태를 미리 경고합니다. TPMS를 설치 한 후이 시스템은 타이어 압력과 온도를 실시간으로 모니터링 할 수 있습니다. 비정상적인 타이어 압력과 온도가 감지되면 시스템은 경고 소리와 밝은 깜박임 아이콘을 보내 실시간으로 알려줍니다. 실시간 알림 및 문제 해결은 교통 사고를 예방하고 라이더와 승객의 안전을 보장 할 수 있습니다.
특징:
QC 3.0 고속 충전 USB 출력으로 휴대 전화, 태블릿 및 전원 은행을 충전 할 수 있습니다.
배터리 전압 감지 및 디스플레이, 저전압 경보 기능을 지원합니다.
사양:
모델: AN-08A
타이어 압력 설정 범위: 0.1 ~ 6.0Bar
온도 설정 범위: 60 ℃ ~ 100 ℃
작업 온도: -20 ℃ ~ + 80 ℃
보관 온도: -30 ℃ ~ + 85 ℃
전력 전압: DC 12V
출력 전압: DC 12V, 9V, 5V
주파수: 433.92MHz ± 20.00MHz
수신기:
작업 온도-20 ℃ ~ 80 ℃
보관 온도: -30 ℃ ~ 85 ℃
전원 켜기 전압: DC 5V
주파수: 433.92MHz ± 20.00MHz
센서:
작업 온도: -20 ℃ ~ 80 ℃
보관 온도: -30 ℃ ~ 85 ℃
압력 범위: 0 ~ 6.6Bar
압력 정확도: +/-0.1Bar
온도 정확도: +/-3 ℃
전송 전력: <10dB
주파수: 433.92MHz ± 20.00MHz
브래킷 설치 지침
1. 나사 2 개를 풀고 오토바이/전기 자전거/자전거를 착용하고 조입니다.
2. 브래킷의 장착 헤드를 필요한 위치쪽으로 놓고 브래킷이 단단한지 확인하십시오.
3. 브래킷에 타이어 압력 리시버를 설치하고 조인 다음 잠급니다. 볼 헤드를 사용하여 튜닝 노브를 회전시켜 조인트 부분을 움직여 적절한 각도를 적절하게 조정하십시오.
전원 설치 지침
1. 설치시 전원 코드를 점화 스위치 뒤에 연결해야하며 종료 후 전원이 자동으로 차단 될 수 있습니다. 빨간색은 12V 양극에 연결되고 검정색은 지면에 연결됩니다.
2. 핸들 바에 고정 브래킷을 설치하고 단단히 잠급니다. 브래킷에 호스트를 설치하고 각도를 조정하고 잠급니다.
3. 호스트가 켜지면 센서를 설치하십시오. 먼저 탬퍼 링을 밸브 노즐에 설치 한 다음 위치에 따라 밸브에 센서를 설치하고 조인 다음 탬퍼 링을 다시 조이고 조입니다. 호스트에 해당 위치가없는 경우 압력이 표시되면 해당 위치에 센서를 다시 설치하십시오.
센서 배터리 교체 지침:
센서의 배터리를 교체 할 때 하나씩 분해하고 쉘을 설치하고 혼합하거나 분해하지 말고 동시에 설치하십시오. 잘못된 쉘로 인해 센서가 잘못 배치되어 다른 타이어에 설치되는 것을 효과적으로 방지 할 수 있습니다. (버튼 CR1632, 작동 온도는-30 ℃ ~ + 80 ℃); 매장에서 구입할 수 있습니다.
1. 센서를 분해하기 전에 너트 렌치를 준비하고 너트를 시계 방향으로 돌려 너트와 센서를 분리 한 다음 시계 반대 방향으로 센서를 제거하십시오.
2. 렌치를 사용하여 센서의 상단 덮개를 시계 반대 방향으로 풉니 다.
3. 배터리 클립에서 오래된 배터리를 꺼내고 환경 보호 분류를 잘하십시오.
4. 포지티브 및 네거티브 위치 (포지티브 "+" 가 위로 향함) 를 구별합니다. 새 버튼 배터리 CR1632 를 설치하십시오.
5. 센서의 상단 덮개를 조인 다음 렌치로 시계 방향으로 조입니다.
참고:
수동 측정, 측정 방법 및 도구에 따라 약간의 크기 편차가 있을 수 있습니다.
사진 조명, 각도 및 디스플레이 모니터가 다르기 때문에 사진이 항목의 실제 색상을 반영하지 못할 수 있습니다.
1 X 수신기
2 X 센서
1 X 브래킷
1 세트 X 액세서리